Wig Making & Styling
At SCAD I took a course in wig making and styling. We practiced wig ventilation, adding a front lace to make a more natural part, styling both contemporary and historical wig styles, and making a wig base fitted to an actor. We learned techniques to maintain and care for wigs, like use heatless styling tools to prevent damage to the wigs if they are made of synthetic hair. My portfolio from the class with every step of my projects is below here or there are descriptions and image of each project below it.
We first practiced wig ventilation on a square of ventilation fabric. I learned the proper tools and techniques of how to ventilate hair, from setting up the netting on over twill tape on the canvas head to how to knot the synthetic hair with a ventilation needle. I gained an appreciation of the time and concentration it takes wig makers to make even a section of a wig. Through repetition and practice the threading and knotting of the hair became faster. The amount of hair you use in each each strand, their distance from each other, and direction will influence how the hair looks.


For this project I adapted a commercial wig to make it look more real and fit a character. Adding a front lace and ventilating a more natural part with hair that isn't all uniform makes a huge difference in a wig's believability. The weft hair that I had found added some visual interest to the wig, being lighter than the roots of the wig but matching the tips of it. I got practice brushing and putting rollers in a wig to add more curls. For my contemporary style I did a French braid across the front. It crosses the head like a crown. This was all done being gentle with the wig and using heatless tools. After finishing I properly washed and detangled the wig to restore and return it to storage ready for the next person. I learned how to style and alter a wig without damaging or irreversably changing it.


For my next project I did a historical wig style, choosing a 15th Century Italian Renaissance wig style. I followed a text book through its many steps to achieve the exact look. You can follow the exact step by step in the power point slides above. A lot of rollers, which I set with a steamer, were used in this project to achieve the many curls. I created hair extensions out of weft hair for this look, a rat hair for the bun and a rope braid to go around it. Strands of pearls were woven into the several rope braids. I learned how to make small ringlets for this look, having to be very tight and neat with rollers. I was able to wear this wig with the Italian Renaissance costume I built and do a photoshoot in it. The look has the elegance and elaborate feel of the era that I wanted.


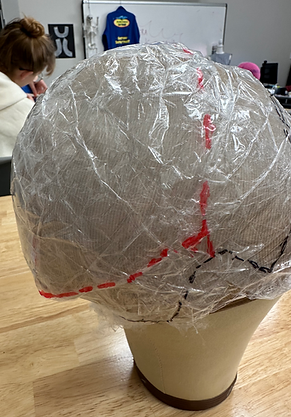
Another skill I learned in the class was how to make a wig based tailored to a specific person. I practiced how to take measurements of someone's head but I also made a cast out of cling wrap and tape, with is a simple but effective way of getting the shape of a head. I traced my model's hair line to determine the area and shape of the wig. I made the base out of ventilation fabric which had different pattern pieces and pieces to achieve the curved shape of the head. The layered twill tape and fabric made the seams secure and the wig base sturdy. I whip stitched all of it by hand. Now it was ready for hair to be attached to it. Knowing how to create a wig foundation to an specific actor's head is a useful tool to have.


